In this post we will see on how to use NSXMLParser to parse an XML file present inside the project bundle but before that lets have a look on what is NSXMLparser and how does it parses an XMLFile
NSXMLParser: Instances of this class parsees XML documents (including DTD declarations) in an event-driven manner. Its an event based parser ( SAX parser). So NSXMLParser notifies its delegate about the items (elements, attributes, CDATA blocks, comments, and so on) that it encounters as it processes an XML document. It also reports parsing errors. For convenience, an NSXMLParser object in the following descriptions is sometimes referred to as a parser object.
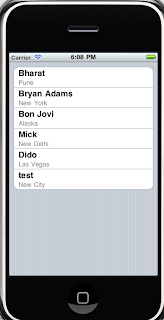
Design Phase: This is the output that we will be getting when we parse the XML file, so for the design part you may see from the design that we have to take a UITableViewController and when we are done parsing the xml file, the XML data will be shown in the table.
Step 1: Open Xcode and create a windows based application and add a UITableVIewController subclass file to it with the name XMLTableViewController,. Add a new NSObject subclass file with the name Employee.
Note: The idea behing the Employee class is that we will be parsing the XML files and will be getting the records of the employees. We will allocate and initalise the employee objects from these records in the xml. This is always a better approach. We should never directly use the xml data. It should be clear to you if not now.
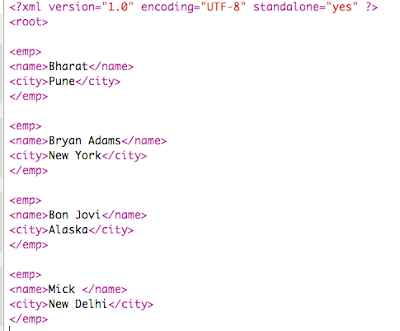
Step 2: The XML file that we are going to parse from the bundle looks like this
Select the XMLTableViewController.h file and declare the add the following code
#import <UIKit/UIKit.h>
#import "Employee.h"
@interface XMLTableViewController : UITableViewController {
NSMutableArray * employees;
Employee * emp_obj;
NSXMLParser * Parser;
NSMutableString * nodeContent;
}
@end
Code Explanation: In the above code you may see that I have declared the object of NSMutableArray class because when our parsing will be done we will be adding the parsed data inside this array and display the content of this array inside the table, The NSMutableString variable named nodeContent will get the data from the xml document and this data will be stored inside the properties of the NSObject subclass called as the Employee, the NSObject subclass is added because even in future if the xml file structure is altered and one new element is added then all you have to do is just add a property inside the Employee file and use the property to get the data from the nodeContent variable of the mutable string. Finally we have declared the object of the NSXMLParser class which will parse the xml file with the help of its delegate methods.
Code of the Employee.h file
@interface Employee : NSObject {
NSString * emp_name;
NSString * emp_city;
}
@property(nonatomic,retain) NSString * emp_name;
@property(nonatomic,retain) NSString * emp_city;
@end
Code of the Employee.m file
#import "Employee.h"
@implementation Employee
@synthesize emp_name,emp_city;
@end
Step 3: Initialize every object inside the init method of the XMLTableView.m here’s the code
- (id)initWithStyle:(UITableViewStyle)style {
if (self = [super initWithStyle:style]) {
employees=[[NSMutableArray alloc]init];
nodeContent=[[NSMutableString alloc]init];
Parser=[NSXMLParser alloc];
Parser.delegate=self;
[self loadXML];
[Parser parse];
}
return self;
}
Code Explanation: As you may see from the above code that the Parser which is an object of the NSXMLParser class has to parse an xml file but for doing that you have to supply in the location of the xml file which is present inside the bundle and once you have done that just call a method called parse of the NXMLParser which notifies the object of the NSXMLParser class to begin with the parsing and since the parsing is done with the help of the delegate method of the class we have specified the delegate of the Parser to self. Below given is the function which will just gives the location to of the XMLFIle to the NSXMLParser
-(void) loadXML
{
NSData * data=[[NSData alloc]initWithContentsOfFile:[[NSBundle mainBundle] pathForResource:@"XMLFile" ofType:@"xml"]];
[Parser initWithData:data];
[data release];
}
Step 4: The NSXMLParser has 3 delegate method called as
didStartElement: Sent by a parser object to its delegate when it encounters a start tag for an element.
foundCharacters: Sent by a parser object to provide its delegate with a string representing all or part of the characters of the current element.
didEndElement: Sent by a parser object to its delegate when it encounters an end tag for an element.
The above are the three method that are mostly used to parse the xml file of course there are some other methods as well you may use those methods as per your business logic
- (void)parser:(NSXMLParser *)parser didStartElement:(NSString *)elementName namespaceURI:(NSString *)namespaceURI qualifiedName:(NSString *)qualifiedName attributes:(NSDictionary *)attributeDict
{
if([elementName isEqualToString:@"emp"])
{
emp_obj=[[Employee alloc]init];
}
}
Code Explanation: Here you specify the start tag of the xml element from where the parsing should actually begin.
Here’s the code of the foundCharacter
- (void)parser:(NSXMLParser *)parser foundCharacters:(NSString *)string
{
[nodeContent appendString:[string stringByTrimmingCharactersInSet:[NSCharacterSet whitespaceAndNewlineCharacterSet]]];
}
Code Explanation: here you append the data from the xml file to the mutable string variable
Here’s the code for the didEndElement
- (void)parser:(NSXMLParser *)parser didEndElement:(NSString *)elementName namespaceURI:(NSString *)namespaceURI qualifiedName:(NSString *)qName
{
if([elementName isEqualToString:@"name"])
{
emp_obj.emp_name=nodeContent;
}
else if([elementName isEqualToString:@"city"])
{
emp_obj.emp_city=nodeContent;
}
else if([elementName isEqualToString:@"emp"])
{
[employees addObject:emp_obj];
[emp_obj release];
emp_obj=nil;
}
[nodeContent release];
nodeContent = nil;
nodeContent = [[NSMutableString alloc]init];
}
Code Explanation: Here you add the data from the xml file present inside the nodecontent to the properties that you have created inside the Employee and then add the object of the Employee class to the object of the mutable array. Once the data is inside the mutable array you may display the data present inside the mutable array in the table.
Check out the datasource methods of the table below
- (NSInteger)numberOfSectionsInTableView:(UITableView *)tableView {
return 1;
}
// Customize the number of rows in the table view.
- (NSInteger)tableView:(UITableView *)tableView numberOfRowsInSection:(NSInteger)section {
return [employees count];
}
// Customize the appearance of table view cells.
- (UITableViewCell *)tableView:(UITableView *)tableView cellForRowAtIndexPath:(NSIndexPath *)indexPath {
static NSString *CellIdentifier = @"Cell";
UITableViewCell *cell = [tableView dequeueReusableCellWithIdentifier:CellIdentifier];
if (cell == nil) {
cell = [[[UITableViewCell alloc] initWithStyle:UITableViewCellStyleSubtitle reuseIdentifier:CellIdentifier] autorelease];
}
Employee * emp = [employees objectAtIndex:indexPath.row];
cell.textLabel.text=emp.emp_name;
cell.detailTextLabel.text=emp.emp_city;
return cell;
}
Step 5: after doing that select the AppDelegate.m file and create the object of the XMLTableViewController in applicationDidFinishLaunching method and run the application here’s the view at the final output.


No comments:
Post a Comment