Tuesday, 6 December 2011

Custom Number pad on iPad

Hello all , recently in one project I had to build a number pad keyboard which will allow user to enter just the number and that's it . On iPad unlike iPhone the UIKeyboardTypeNumberPad does not work . Even if you use this , it brings up the default keyboard . On iPad there is a pretty amount of space , so Apple might not have considered this UIKeyboardTypeNumberPad keyboard as the requirement on iPad . Well second thing about the default keyboard is that it is too big , cause I just want to enter numbers nothing else . So here we go and create our custom number pad to enter the numbers in a text field. To get an idea how it will look , just check out the image below.

Note : This number pad is very specific to iPad , as we will be using UIPopOverController designed for iPad only.


Two things we are going to do here .
1) We don't want the default keyboard to pop up when user hits the text field .
2) We want our number pad not to pop up from the bottom of the screen but just right below the text field in a popover .


Lets start with it . Create an iPad project , you can select the view based Application , then next select the iPad from the device list. Name it "CustomNumericKeyboard" . You should see below files in your project .


Drag and drop the below files in the project . You will find these in the sample code attached at the bottom.
1) NumericKBViewController.h
1) NumericKBViewController.m
1) NumericKBViewController.xib

Now your resources pane should look like this .


Next import the "NumericKBViewController.h" at the top of your "CustomNumericKeyboardViewController.h" . Now your class file should look like below .
#import <UIKit/UIKit.h>
#import "NumericKBViewController.h"

@interface CustomNumericKeyboardViewController : UIViewController
{

}
@property(nonatomic,retain) IBOutlet MTextField * textField;

@end

Note down that I have created a custom UITextField class for this purpose , so I am creating an outlet with MTextField object instead of UITextField. MTextField class resides in the "NumericKBViewController.h" that we have added just now to our project. I will shortly highlight why I did this. Next add a text field on the xib file . At this moment don't try to connect the outlet that we have created . Before that you have to set the class for the text field as "MTextField" . How to do that ? check the screen shot below .


Select the text field , go to the right detail pane on the right side . In the third tab ( Identity inspector ) , it will show you the class name as UITextField . Just make it as MTextField . Once you set that , you can connect the IBOutlet that we have created in the class header with this text field on the xib.


In the viewDidLoad method of the view controller , add the below lines of code.


- (void)viewDidLoad
{
    [super viewDidLoad];
    [self.textField addTarget:self action:@selector(textFieldTouched:) forControlEvents:UIControlEventTouchDown];
   
}


Next add a method just after this


- (void)textFieldTouched:(id)sender {
       
    MPopOverController * popOver = [MPopOverController kbPopOverControllerForTextField:self.textField];
    [popOver presentPopoverFromRect:textField.frame inView:self.view permittedArrowDirections:UIPopoverArrowDirectionUp animated:YES];
   
}


And thats it , build and run your project , you should see a nice text field . Click on it and it will bring up the custom number pad which is far much easier and friendlier to enter the number compared to the default keyboard .


Download the Project Code here .


Try to understand the code , its actually quite easy. If you don't, let me explain that to you.


Below are some classes used.


MTextField
text field and few more views have the property called as inputView . This view is nothing but actually the keyboard view in case of the text field . So the thing we did is we are overriding the -(UIView*)inputView getter for the property inputView. Here we return a transparent empty UIView object. Now if users taps the textfield , a transparent view will popup from the bottom instead of the keyboard . Id you want to test this go to this method and try changing the backgroundColor of the view that we return over here and you will see what happens.


NumbericKBViewController
Its a view controller which actually displays our number pad . It actually holds the reference of the text field for which we are displaying this view controller . For more info , you can check out the IBOutlets and IBActions on how it manages the number entry part .


MPopOverController
Well Its simply a UIPopOverController subclass customized to suit our need . I will be using this custom number pad at lots of places in my project , so just wanted to make it a concrete independent utility that I can use with few lines of code at any place . And thats how even the demo project attached above uses it.


Well thats all for now . I hope this post will help you understand How to create Custom Keyboard , PopOverController to make things easy and really beautiful on iPad Apps . Keep checking for more posts soon . For any queries feel free to main me on bharat.jagtap@bitcode.in … Thank You !!


Saturday, 12 November 2011

IPhone Interview Questions

Hello All , download the iPhone interview questions from the below link .

iPhone Interview Questions

If you have few more questions , feel free to post those as comments to this blog post . I will add those to the file. Take care and Happy iphone programming :-)

Friday, 2 September 2011

Using RESTfull services | Parsing JSON | Google Translate API


In this tutorial we are going to see three things
1) How to consume RESTfull Services in iOS.
2) How to parse JSON response.
3) Google Translate APIs.


Basically there are two types of web-services .
1) SOAP services.
2) REST Services.

SOAP services deal with SOAP protocol. It uses xml . While using SOAP services you have to follow the set of strict rules to create and receive SOAP messages. We would talk about that in details in the SOAP services post.

As now a days the most widely used services are REST services , we will focus on that in this tutorial. Some advantages using REST services are as below

1) It can use JSON . ( Very light weight way for data communication compared to XML )
2) Easy to implement .
3) Parsing JSON is quit easy.
4) Because of all the above , you achieve the quick response time .

( Note : Again whether to go for REST or SOAP completely depends on the server side programmer who is creating the web services . If you are responsible for both side work ( iPhone and sever side coding ) then REST service with JSON would almost solve the purpose. )

Ok that is enough talk about the web services. If you want you simply google the terms RESTfull web services or SOAP web services to know more about them .Lets get to the implementation part.

Now in this tutorial we are going to user google's REST services for language translation. I am talking about the Google Translate APIs. Our final output will look like below screenshot.


User will be entering some text in English . User will have some choices of languages to choose for the translation. When user presses the translate button , we will do the web service consuming task and will display the translated text in the label at the bottom.

Project Setup
We are going to parse the JSON in this project so lets download the JSON parsing library for our project. The most widely used in iOS is SB-JSON. Its the third party library for parsing JSON text. Download the files from below link.

https://github.com/downloads/stig/json-framework/SBJson_v3.0.4.zip

Download the file , save this on your mac as you would be needing this lot many times in the future projects. Ok , next expand the zip . You can see some folders like classes , examples etc.. What we need is the classes folder .You can see a number of files in the classes folder. Drag all these files into the Xcode project that you have created . When you add the files to the project , make sure the copy files if Needed checkbox is checked. This will actually copy all the files to your project.

(Note : You can just create a group in the project to add all these files so that it would look cleaner and is always better to manage ).


You can now build the project just to make sure that JSON parser files have been successfully integrated with the project.

Next , lets add a new file that is UIViewController subclass . I have named it MyViewController with the XIB for user interface . The xib view will look like this.


The view contains following controls.
  • A picker for displaying different languages.
  • A text filed for user to enter the text ( English text ).
  • A button.
  • A label to display the translated text.
Make sure you set the datasource and delegate of the picker to the file's owner. Also set the delegate of the textField to the files owner.

Lets go to MyViewController.h. It should look like this.


You can see three outlets , one for each picker, textField and valueLabel. There are two methods

-(IBAction)translate:(id)sender; -(void)parseJSONString:(NSString*)string;


-(IBAction)translate:(id)sender;
This method would be invoked on the translate button touch up.

-(void)parseJSONString:(NSString*)string;
This method would be used to parse the JSON response.


We have got two arrays langNames and langCodes. langNames array will store the languages names like Hindi , French , Arabic etc. langCodes array will store the corresponding language codes like "hi" for Hindi , "fr" for french etc..

Lets have a loot at the initWithNibName method.


Implement the following textField and UIPickerView datasource and delegate methods. You can simply copy these in your MyViewController.m


#pragma TextField Delegate Methods

- (BOOL)textFieldShouldReturn:(UITextField *)textField
{
[textField resignFirstResponder];
return YES;
}
#pragma Picker Methods

- (NSInteger)numberOfComponentsInPickerView:(UIPickerView *)pickerView
{
return 1;
}

- (NSInteger)pickerView:(UIPickerView *)pickerViewnumberOfRowsInComponent:(NSInteger)component
{
return [langNames count];
}

- (NSString *)pickerView:(UIPickerView *)pickerView titleForRow:(NSInteger)rowforComponent:(NSInteger)component
{
return [langNames objectAtIndex:row];
}


Now this will display the languages in the picker. Next Lets have a look at the method that would be called on translate button touch.


-(IBAction)translate:(id)sender
{
// get theselectec langauge number and with that fetch the correposing language code fromthe langCodes array.
int selected = [langPicker selectedRowInComponent:0];
NSString * langCode =[langCodes objectAtIndex:selected];
// Below isthe webservice URL. It takes two parameters in the query string , 1) text to betranslated and then langpair=en|%@" from en to %@ language.
// q=%@ ( for text to be translated )
// v=1.0 (this is the only version for google translate api available , so no worries).
//langpair=en|%@ ( It is of the form from_language|to_language ).
NSString *serviceURLString = @"https://ajax.googleapis.com/ajax/services/language/translate?q=%@&v=1.0&langpair=en|%@";
// Here wereplaces the placeholder with the actual values.
NSString *serviceURLFinalString = [NSString stringWithFormat:serviceURLString,englishField.text,langCode];
// Here wereplaces the empty spaces , '|' , etc characters with correspoing %escapes.( wecan not have a black space in the URL )
serviceURLFinalString =[serviceURLFinalString stringByAddingPercentEscapesUsingEncoding:NSUTF8StringEncoding];
// Create aNSURL object from the string.
NSURL *serviceURLFinal = [NSURL URLWithString:serviceURLFinalString];
// fetchingthe contents from the string.
NSString * response =[NSString stringWithContentsOfURL:serviceURLFinalencoding:NSUTF8StringEncoding error:nil];
NSLog(@"Response: %@ ",response);
[self parseJSONString:response];
}


The above method is well commented , so you can read the comments to understand what we are doing exactly. We are logging the response on the console. So for the time being you can comment the line [self parseJSONString:response]; and simply check the what response we are getting on the console . If I enter a text "We are iPhone programmers." then the response we get is a JSON response as below.

Now our next task would be to parser this JSON and display the translated text in the value label.
The method parseJSONString does the work. Lets have a look at the implementation.


-(void)parseJSONString:(NSString*)string
{
NSDictionary * responseDic= [string JSONValue];
if([[responseDic objectForKey:@"responseStatus"] intValue] == 200 )
{
NSString * value =[[responseDic objectForKey:@"responseData"] objectForKey:@"translatedText"];
valueLabel.text = value;
}
else
{
valueLabel.text = @"Pleaseenter a valid English text !!!";
}
}

Explanation : The above method parses the JSON response string.
[string JSONValue]; returns a dictionary of the JSON response. First we check if the reponseStatus is 200 or not . If it is 200 that means we have got the proper response. So next fetch the translated text and assign it to the value label.
Run the program and test it with different languages . Lets have a look at the output.


Hope this post helps you all in handling restful services , parsing JSON and integrating the Google Translate APIs. If you have any doubts or issues , feel free to post them as comments. Keep checking the blog for more posts soon !!!

Thank You!!!


Wednesday, 6 July 2011

XML parsing using NSXMLParser ( SAX Parser for iPhone )


In this post we will see on how to use NSXMLParser to parse an XML file present inside the project bundle but before that lets have a look on what is NSXMLparser and how does it parses an XMLFile
NSXMLParser: Instances of this class parsees XML documents (including DTD declarations) in an event-driven manner. Its an event based parser ( SAX parser). So NSXMLParser notifies its delegate about the items (elements, attributes, CDATA blocks, comments, and so on) that it encounters as it processes an XML document. It also reports parsing errors. For convenience, an NSXMLParser object in the following descriptions is sometimes referred to as a parser object.
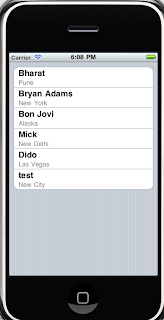
Design Phase: This is the output that we will be getting when we parse the XML file, so for the design part you may see from the design that we have to take a UITableViewController and when we are done parsing the xml file, the XML data will be shown in the table.


Step 1: Open Xcode and create a windows based application and add a UITableVIewController subclass file to it with the name XMLTableViewController,. Add a new NSObject subclass file with the name Employee.
Note: The idea behing the Employee class is that we will be parsing the XML files and will be getting the records of the employees. We will allocate and initalise the employee objects from these records in the xml. This is always a better approach. We should never directly use the xml data. It should be clear to you if not now.
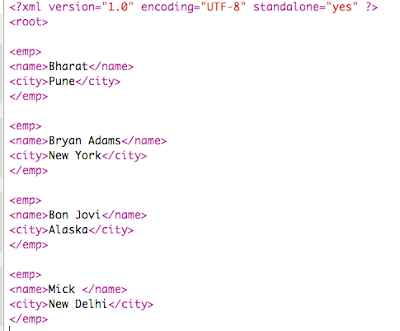
Step 2: The XML file that we are going to parse from the bundle looks like this
Select the XMLTableViewController.h file and declare the add the following code
#import <UIKit/UIKit.h>
#import "Employee.h"

@interface XMLTableViewController : UITableViewController {

         NSMutableArray * employees;
         Employee * emp_obj;
         NSXMLParser * Parser;
         NSMutableString * nodeContent;
}

@end
Code Explanation: In the above code you may see that I have declared the object of NSMutableArray class because when our parsing will be done we will be adding the parsed data inside this array and display the content of this array inside the table, The NSMutableString variable named nodeContent will get the data from the xml document and this data will be stored inside the properties of the NSObject subclass called as the Employee, the NSObject subclass is added because even in future if the xml file structure is altered and one new element is added then all you have to do is just add a property inside the Employee file and use the property to get the data from the nodeContent variable of the mutable string. Finally we have declared the object of the NSXMLParser class which will parse the xml file with the help of its delegate methods.
Code of the Employee.h file
@interface Employee : NSObject {

         NSString * emp_name;
         NSString * emp_city;
}
@property(nonatomic,retain) NSString * emp_name;
@property(nonatomic,retain) NSString * emp_city;
@end
Code  of the Employee.m file
#import "Employee.h"


@implementation Employee

@synthesize emp_name,emp_city;

@end

Step 3: Initialize every object inside the init method of the XMLTableView.m here’s the code
- (id)initWithStyle:(UITableViewStyle)style {


    if (self = [super initWithStyle:style]) {
            employees=[[NSMutableArray alloc]init];
            nodeContent=[[NSMutableString alloc]init];
            Parser=[NSXMLParser alloc];
            Parser.delegate=self;
            [self loadXML];
            [Parser parse];
    }
    return self;
}
Code Explanation: As you may see from the above code that the Parser which is an object of the NSXMLParser class has to parse an xml file but for doing that you have to supply in the location of the xml file which is present inside the bundle and once you have done that just call a method called parse of the NXMLParser which notifies the object of the NSXMLParser class to begin with the parsing and since the parsing is done with the help of the delegate method of the class we have specified the delegate of the Parser to self. Below given is the function which will just gives the location to of the XMLFIle to the NSXMLParser
-(void) loadXML
{
         NSData * data=[[NSData alloc]initWithContentsOfFile:[[NSBundle mainBundle] pathForResource:@"XMLFile" ofType:@"xml"]];
         [Parser initWithData:data];
         [data release];
        
}
Step 4: The NSXMLParser has 3 delegate method called as
didStartElement: Sent by a parser object to its delegate when it encounters a start tag for an element.
foundCharacters: Sent by a parser object to provide its delegate with a string representing all or part of the characters of the current element.
didEndElement: Sent by a parser object to its delegate when it encounters an end tag for an element.
The above are the three method that are mostly used to parse the xml file of course there are some other methods as well you may use those methods as per your business logic
- (void)parser:(NSXMLParser *)parser didStartElement:(NSString *)elementName namespaceURI:(NSString *)namespaceURI qualifiedName:(NSString *)qualifiedName attributes:(NSDictionary *)attributeDict
{
         if([elementName isEqualToString:@"emp"])
         {
            emp_obj=[[Employee alloc]init];
         }
        
}
Code Explanation: Here you specify the start tag of the xml element from where the parsing should actually begin.
Here’s the code of the foundCharacter

- (void)parser:(NSXMLParser *)parser foundCharacters:(NSString *)string
{
        
[nodeContent appendString:[string stringByTrimmingCharactersInSet:[NSCharacterSet whitespaceAndNewlineCharacterSet]]];
}

Code Explanation: here you append the data from the xml file to the mutable string variable
Here’s the code for the didEndElement
- (void)parser:(NSXMLParser *)parser didEndElement:(NSString *)elementName namespaceURI:(NSString *)namespaceURI qualifiedName:(NSString *)qName
{
         if([elementName isEqualToString:@"name"])
         {
            emp_obj.emp_name=nodeContent;
         }
         else if([elementName isEqualToString:@"city"])
         {
            emp_obj.emp_city=nodeContent;
           
         }
         else if([elementName isEqualToString:@"emp"])
         {
            [employees addObject:emp_obj];
            [emp_obj release];
            emp_obj=nil;
        
         }
         [nodeContent release];
         nodeContent = nil;
         nodeContent = [[NSMutableString alloc]init];
        
        
}
 Code Explanation: Here you add the data from the xml file present inside the nodecontent to the properties that you have created inside the Employee and then add the object of the Employee class to the object of the mutable array. Once the data is inside the mutable array you may display the data present inside the mutable array in the table.
Check out the datasource methods of the table below
- (NSInteger)numberOfSectionsInTableView:(UITableView *)tableView {
    return 1;
}

// Customize the number of rows in the table view.
- (NSInteger)tableView:(UITableView *)tableView numberOfRowsInSection:(NSInteger)section {
    return [employees count];
}

// Customize the appearance of table view cells.
- (UITableViewCell *)tableView:(UITableView *)tableView cellForRowAtIndexPath:(NSIndexPath *)indexPath {
   
    static NSString *CellIdentifier = @"Cell";
   
    UITableViewCell *cell = [tableView dequeueReusableCellWithIdentifier:CellIdentifier];
    if (cell == nil) {
        cell = [[[UITableViewCell alloc] initWithStyle:UITableViewCellStyleSubtitle reuseIdentifier:CellIdentifier] autorelease];
    }
    
     Employee * emp = [employees objectAtIndex:indexPath.row];
     cell.textLabel.text=emp.emp_name;
     cell.detailTextLabel.text=emp.emp_city;
    return cell;
}

Step 5: after doing that select the AppDelegate.m file and create the object of the XMLTableViewController in applicationDidFinishLaunching method and run the application here’s the view at the final output.

Friday, 17 June 2011

XML Dom Parser for iPhone - GDataXML Parser


GDataXML is Google’s XML processing library. We have choosen GDataXML since it performs well for DOM parsers, supports both reading and writing, and is so easy to integrate. However, if you are using a different DOM parser, it should be almost exactly the same as this but just slightly different API calls.
Design Phase: For this sample application we will parse an XML file that is present in the bundle and display its content in the table view.
Before beginning with this tutorial you have to download the GData library from below link
Step 1: Open Xcode and select the windows based application template and add UITableViewController subclass file to it with the name MyTableViewController, after doing this their would be two files that would be added into your class group [MyTableViewController.h and MyTableViewController.m].
Step 2: Add the GData library into your project so for that select the downloaded GData file from the download folder and inside the folder you will find a folder with the name source and then inside the source folder you will find a folder named “XML support”, drag and drop this folder into your application. Make sure you add this by selecting the copy files into destination folder option.


Once this is done then we will have to do some settings so that GData library works nicely with our application.
Perform the settings that are given below:
1) Select the project tab from the xcode menu and select the edit project settings option


2) You will see a window in front of you that’s your project window from there select the header search path option (you can type header search path in the search bar) and type the following that is given in the image below


3) Once you are done with header search path the other setting that you have to do is set the other linker flag (you may type other linker flag in the search bar), now once you find the other linker flag just type the following data in the image given below


4) Now its time to test whether you have made the correct settings or not and for that you have to import the GDatatXMLNode header file in the  .h file of the MyTableViewController class and press build your application.

Step 3: Here’s a look at our XML file, which is present in the bundle, now in order to read this file just follow the steps given below


First in the .h file declare the following objects, I have used comments to describe the objects,
#import <UIKit/UIKit.h>
#import "GDataXMLNode.h"

@interface MyTableViewController: UITableViewController {

 //stores the entire data about the XML document
 GDataXMLDocument *xmlDocument;

 //string variable to hold the location of the XML File
 NSString *xmlFileLocation;

 //after parsing the data will be stored in the array
 NSMutableArray *data_from_xml;

 //stores the error information that occured
 NSError *error;
}
@end

Now into the .m file, select the init method and add this piece of code.

-(id)initWithStyle:(UITableViewStyle)style {
    if (self = [super initWithStyle:style]) {
  xmlFileLocation = [[NSBundle mainBundle]pathForResource:@"Cars" ofType:@"xml"];
  NSData *xmlData = [NSData dataWithContentsOfFile:xmlFileLocation];
  xmlDocument = [[GDataXMLDocument alloc]initWithData:xmlData options:0 error:&error];
   NSArray *getData = [[xmlDocument rootElement]elementsForName:@"car"];
  data_from_xml = [[NSMutableArray alloc]init];
  for(GDataXMLElement *e in getData)
  {
   [data_from_xml addObject:e];
  }
    }
    return self;
}

Step 4: Now once the above step is completed then just add the number of sections and rows for section in the datasource method of the table view, here’s a view of doing that
#pragma mark Table view methods
- (NSInteger)numberOfSectionsInTableView:(UITableView *)tableView {
    return 1;
}
// Customize the number of rows in the table view.
- (NSInteger)tableView:(UITableView *)tableView numberOfRowsInSection:(NSInteger)section {
    return [data_from_xml count];
}

Now its time to see some real GData
In the cell for row at index path method when you give title to each cells then in this case the titles will be coming from the XML file so for that what you have to do is select the appropriate elements from the XML file and display them in the table view and here’s how you do that
// Customize the appearance of table view cells.
- (UITableViewCell *)tableView:(UITableView *)tableView cellForRowAtIndexPath:(NSIndexPath *)indexPath {
    
    static NSString *CellIdentifier = @"Cell";
    UITableViewCell *cell = [tableView dequeueReusableCellWithIdentifier:CellIdentifier];
    if (cell == nil) {
        cell = [[[UITableViewCell alloc] initWithStyle:UITableViewCellStyleSubtitle reuseIdentifier:CellIdentifier] autorelease];
    }
    // Set up the cell...
 cell.textLabel.text = [[[[data_from_xml objectAtIndex:indexPath.row]elementsForName:@"company"]objectAtIndex:0]stringValue];
 cell.detailTextLabel.text = [[[[data_from_xml objectAtIndex:indexPath.row]elementsForName:@"model"]objectAtIndex:0]stringValue];
    
 return cell;
}

Step 5: Select the AppDelegate.m file and add the table view to the window.  Here is how you will do that.

#import "GDataAppAppDelegate.h"
#import "MyTableViewController.h"
@implementation GDataAppAppDelegate
@synthesize window;
- (void)applicationDidFinishLaunching:(UIApplication *)application {    
    // Override point for customization after application launch
 MyTableViewController * mtvc = [[MyTableViewController alloc]initWithStyle:UITableViewStyleGrouped];
 [window addSubview:mtvc.view];
    [window makeKeyAndVisible];
}
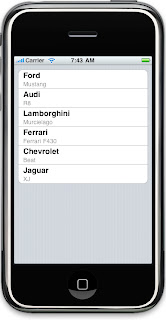
Click build and go you will see the output as given below


Summary
In this post, we have read the xml document using a dom parser. Now using GData you can also write an xml file to store your applications data. We will soon have a tutorial for that as well.