Friday, 17 June 2011

XML Dom Parser for iPhone - GDataXML Parser


GDataXML is Google’s XML processing library. We have choosen GDataXML since it performs well for DOM parsers, supports both reading and writing, and is so easy to integrate. However, if you are using a different DOM parser, it should be almost exactly the same as this but just slightly different API calls.
Design Phase: For this sample application we will parse an XML file that is present in the bundle and display its content in the table view.
Before beginning with this tutorial you have to download the GData library from below link
Step 1: Open Xcode and select the windows based application template and add UITableViewController subclass file to it with the name MyTableViewController, after doing this their would be two files that would be added into your class group [MyTableViewController.h and MyTableViewController.m].
Step 2: Add the GData library into your project so for that select the downloaded GData file from the download folder and inside the folder you will find a folder with the name source and then inside the source folder you will find a folder named “XML support”, drag and drop this folder into your application. Make sure you add this by selecting the copy files into destination folder option.


Once this is done then we will have to do some settings so that GData library works nicely with our application.
Perform the settings that are given below:
1) Select the project tab from the xcode menu and select the edit project settings option


2) You will see a window in front of you that’s your project window from there select the header search path option (you can type header search path in the search bar) and type the following that is given in the image below


3) Once you are done with header search path the other setting that you have to do is set the other linker flag (you may type other linker flag in the search bar), now once you find the other linker flag just type the following data in the image given below


4) Now its time to test whether you have made the correct settings or not and for that you have to import the GDatatXMLNode header file in the  .h file of the MyTableViewController class and press build your application.

Step 3: Here’s a look at our XML file, which is present in the bundle, now in order to read this file just follow the steps given below


First in the .h file declare the following objects, I have used comments to describe the objects,
#import <UIKit/UIKit.h>
#import "GDataXMLNode.h"

@interface MyTableViewController: UITableViewController {

 //stores the entire data about the XML document
 GDataXMLDocument *xmlDocument;

 //string variable to hold the location of the XML File
 NSString *xmlFileLocation;

 //after parsing the data will be stored in the array
 NSMutableArray *data_from_xml;

 //stores the error information that occured
 NSError *error;
}
@end

Now into the .m file, select the init method and add this piece of code.

-(id)initWithStyle:(UITableViewStyle)style {
    if (self = [super initWithStyle:style]) {
  xmlFileLocation = [[NSBundle mainBundle]pathForResource:@"Cars" ofType:@"xml"];
  NSData *xmlData = [NSData dataWithContentsOfFile:xmlFileLocation];
  xmlDocument = [[GDataXMLDocument alloc]initWithData:xmlData options:0 error:&error];
   NSArray *getData = [[xmlDocument rootElement]elementsForName:@"car"];
  data_from_xml = [[NSMutableArray alloc]init];
  for(GDataXMLElement *e in getData)
  {
   [data_from_xml addObject:e];
  }
    }
    return self;
}

Step 4: Now once the above step is completed then just add the number of sections and rows for section in the datasource method of the table view, here’s a view of doing that
#pragma mark Table view methods
- (NSInteger)numberOfSectionsInTableView:(UITableView *)tableView {
    return 1;
}
// Customize the number of rows in the table view.
- (NSInteger)tableView:(UITableView *)tableView numberOfRowsInSection:(NSInteger)section {
    return [data_from_xml count];
}

Now its time to see some real GData
In the cell for row at index path method when you give title to each cells then in this case the titles will be coming from the XML file so for that what you have to do is select the appropriate elements from the XML file and display them in the table view and here’s how you do that
// Customize the appearance of table view cells.
- (UITableViewCell *)tableView:(UITableView *)tableView cellForRowAtIndexPath:(NSIndexPath *)indexPath {
    
    static NSString *CellIdentifier = @"Cell";
    UITableViewCell *cell = [tableView dequeueReusableCellWithIdentifier:CellIdentifier];
    if (cell == nil) {
        cell = [[[UITableViewCell alloc] initWithStyle:UITableViewCellStyleSubtitle reuseIdentifier:CellIdentifier] autorelease];
    }
    // Set up the cell...
 cell.textLabel.text = [[[[data_from_xml objectAtIndex:indexPath.row]elementsForName:@"company"]objectAtIndex:0]stringValue];
 cell.detailTextLabel.text = [[[[data_from_xml objectAtIndex:indexPath.row]elementsForName:@"model"]objectAtIndex:0]stringValue];
    
 return cell;
}

Step 5: Select the AppDelegate.m file and add the table view to the window.  Here is how you will do that.

#import "GDataAppAppDelegate.h"
#import "MyTableViewController.h"
@implementation GDataAppAppDelegate
@synthesize window;
- (void)applicationDidFinishLaunching:(UIApplication *)application {    
    // Override point for customization after application launch
 MyTableViewController * mtvc = [[MyTableViewController alloc]initWithStyle:UITableViewStyleGrouped];
 [window addSubview:mtvc.view];
    [window makeKeyAndVisible];
}
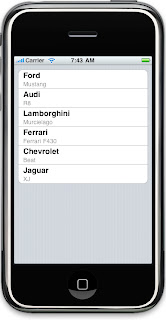
Click build and go you will see the output as given below


Summary
In this post, we have read the xml document using a dom parser. Now using GData you can also write an xml file to store your applications data. We will soon have a tutorial for that as well.

Custom TableView Cell


In this post we will have a look on how to create a custom cell for the table view. 
Design view: For this demo we will make a custom UITableViewCell with three labels and one image view, the three labels will represent details about a particular cartoon character including an image view which will show the image of that cartoon character. Here is a view at the final output.

Step 1: Open Xcode and select the windows based application template and add the UITableViewController subclass file to the project with the name MyTableViewController or any other name of your choice. Now there will be two files that would be added into your project those are the MyTableViewController.h and MyTableViewController.m file. Now add a UITableViewCell subclass file to your project with the name MyCustomCell and two more files will be added with the name MyCustomCell.h and MyCustomCell.m.


Step 2: Select the MyCustomCell.h file and declare three variables of UILabel type and one variable of UIImageView type. Also declare the properties of these variables that you will be using (we are declaring properties so that we can access these variables with the help of the dot operator in the MyTableViewController.m file). Here’s the code to do that.

#import <UIKit/UIKit.h>
@interface MyCustomCell: UITableViewCell {
 UILabel *charName,*cartoonName,*charCity;
 UIImageView *charImage;
}
@property (nonatomic,retain) UILabel *charName,*cartoonName,*charCity;
@property (nonatomic,retain) UIImageView *charImage;
@end

Step 3: In the MyCustomCell.m file give memory to these variables
#import " MyCustomCell.h"
@implementation MyCustomCell
@synthesize charCity,charName,charImage,cartoonName;

- (id)initWithFrame:(CGRect)frame reuseIdentifier:(NSString *)reuseIdentifier {
    if (self = [super initWithFrame:frame reuseIdentifier:reuseIdentifier]) {
        // Initialization code
    charName = [[UILabel alloc]initWithFrame:CGRectMake(102, 14, 85, 21)];
    charName.font = [UIFont fontWithName:@"Verdana" size:12.0f];
    
    cartoonName = [[UILabel alloc]initWithFrame:CGRectMake(102, 40, 111,21)];
    cartoonName.font = [UIFont fontWithName:@"Verdana" size:12.0f];
 
    charCity = [[UILabel alloc]initWithFrame:CGRectMake(102, 65, 81, 21)];
    charCity.font = [UIFont fontWithName:@"Verdana" size:12.0f];
 
charImage = [[UIImageView alloc]initWithFrame:CGRectMake(7, 12, 78, 70)];
 
  //adding the controls in the table cell
  [self.contentView addSubview:charName];
  [self.contentView addSubview:cartoonName];
  [self.contentView addSubview:charCity];
  [self.contentView addSubview:charImage];
 
    }
    return self;
}
Now after allocating memory to the variables and setting the frame of the lables and the imageView its time to add this custom cell to our table view so in order to do that first you have to import the MyCustomCell.h as the header in the MyTableViewController.h file

#import <UIKit/UIKit.h>
#import " MyCustomCell.h"

@interface MyTableViewController: UITableViewController {
}
@end

and then in the MyTableViewController.m file go to the

- (UITableViewCell *)tableView:(UITableView *)tableView cellForRowAtIndexPath:(NSIndexPath *)indexPath {


Here all you have to do is replace the below code 

    UITableViewCell *cell = [tableView dequeueReusableCellWithIdentifier:CellIdentifier];
    if (cell == nil) {
        cell = [[[UITableViewCell alloc] initWithStyle:UITableViewCellStyleDefault reuseIdentifier:CellIdentifier] autorelease];
    }

With this code

 MyCustomCell *cell = (MyCustomCell *)[tableView dequeueReusableCellWithIdentifier:CellIdentifier];
    if (cell == nil) {
        cell = [[[MyCustomCell alloc] initWithFrame:CGRectZero reuseIdentifier:CellIdentifier] autorelease];
    }

and then using switch case manipulate the cells

switch (indexPath.row) {
 case 0:
  cell.cartoonName.text = @"Dragon ball z";
  cell.charName.text = @"Goku";
  cell.charCity.text= @"Japan";
  cell.charImage.image = [UIImage imageNamed:@"goku.jpg"];
  break;
 
 case 1:
  cell.cartoonName.text = @"Batman ";
  cell.charName.text = @"Bruce Wyane";
  cell.charCity.text= @"Gotham City";
  cell.charImage.image = [UIImage imageNamed:@"batman4952.jpg"];
  break;
 
 case 2:
  cell.cartoonName.text = @"Superman";
  cell.charName.text = @"Clark Kent";
  cell.charCity.text= @"Krypton";
  cell.charImage.image = [UIImage imageNamed:@"superman.jpg"];
  break;
 
 case 3:
  cell.cartoonName.text = @"Spider man";
  cell.charName.text = @"Peter Parker";
  cell.charCity.text= @"NewYork";
  cell.charImage.image = [UIImage imageNamed:@"Spider-Man.jpg"];
  break;
 
 case 4:
  cell.cartoonName.text = @"Iron Man";
  cell.charName.text = @"Tony Stark";
  cell.charCity.text= @"U.S.A";
  cell.charImage.image = [UIImage imageNamed:@"ironman.jpg"];
  break;

}
Step 4: The above code is self-explanatory.  By using switch case operator We are giving different names and images to different cells of the table view.
Note: for this demo we have to increase the row height of the cell. So implement the below delegate method of the UITableView.
- (CGFloat)tableView:(UITableView *)tableView heightForRowAtIndexPath:(NSIndexPath *)indexPath
{
 return 90;
}

Step 5: Select the AppDelegate.m file of your project and add this piece of code and then run your application to get the output just like the above image

#import "CustomCelldemoAppDelegate.h"
#import "MyTableViewController.h"
@implementation CustomCelldemoAppDelegate
@synthesize window;
- (void)applicationDidFinishLaunching:(UIApplication *)application {    

    // Override point for customization after application launch
 MyTableViewController *mtVC = [[MyTableViewController alloc]init];
 [window addSubview:mtVC.view];

    [window makeKeyAndVisible];
}

After adding this select build and go and get the below output


UINavigationController


In this tutorial , we will see how to use navigation controller ( UINavigationController ) to do the basic navigation in iPhone applications.

UINavigationController
In iPhone, navigation controller is the object that takes care of changing the views. So we do not directly add and remove view from the window instead we use navigation object. We pass the different ViewController’s object to the navigation and it takes care of adding the views and removing the views of those view controllers. Internally it maintains a stack of the view controllers. So to switch to a new view, we need to push the corresponding controller object into the navigation object’s stack. Lets see how we do that.
Design Phase: We need a two UITableViewController subclass file with each containing some appropriate data and on the selection of any row by the user the second view will be displayed.

Step 1: Open Xcode and create window based application project now add two UITableViewController subclass file to your class group with the name FirstTableViewController and SecondTableViewController. Now at this moment your class group must contain four new files with the name
FirstTableViewController.h, FirstTableViewController.m , SecondTableViewController.h and SecondTableViewController.m

Step 2: Add a mutable array to both the files and arrange the section and title as per the MutableArray (refer our table view tutorial for this ).

Step 3: In the FirstTableViewController.m import the SecondTableViewController.h file and create its object in the following function

- (void)tableView:(UITableView *)tableView didSelectRowAtIndexPath:(NSIndexPath *)indexPath 
SecondTableViewController *sTVC = [[SecondTableViewController alloc]initWithStyle:UITableViewStyleGrouped];
Now go to the AppDelegate .m file of your application and add the UINavigationController class and here is the code to do that

#import "NavigationControllerDemoAppDelegate.h"
#import " FirstTableViewController.h"

@implementation NavigationControllerDemoAppDelegate
@synthesize window;

- (void)applicationDidFinishLaunching:(UIApplication *)application {    

    // Override point for customization after application launch
 FirstTableViewController *firstTVC = [[FirstTableViewController alloc]initWithStyle:UITableViewStyleGrouped];

 UINavigationController *nav = [[UINavigationController alloc]initWithRootViewController: firstTVC];

 [window addSubview:nav.view];
 [window makeKeyAndVisible];
}

Code Explanation: In the above code, We have created the object of the FirstTableViewController and also We have created the object of UINavigationController using initWithRootViewController method of the navigationController. This means we are pushing FirstTableView controller’s object at the root of the navigation. So the first view that would be displayed would be of FirstTableViewController.
And ultimately it’s the navigation’s view that you will be adding on to the window because the navigation object now will take care of all the visible views.

Step 4: Hold on a second we are not done yet into the FirstTableViewController.m . You must have earlier created the object of SecondTableViewController right, so now its time to tell the navigationController that on the hit of  any row of the tableview of the FirstTableViewController you should be traversed to the secondview, so you do that with the help of the following code

- (void)tableView:(UITableView *)tableView didSelectRowAtIndexPath:(NSIndexPath *)indexPath {
 SecondTableViewController *sTVC = [[SecondTableViewController alloc]initWithStyle:UITableViewStyleGrouped];
 [self.navigationController pushViewController: sTVC animated:YES];
[sTVC release];

}

Step 5: Just press build and Go and enjoy the simple navigation app that you made,


Now from the above code it is clear that the above code is of no use and was for you people to know how the navigation controller works, what we are actually keen to learn is that when the user will select an particular index from the row of that table he must be traversed to the next view with the next view showing the data which must be related as per the selection of the user. So here’s how you will do that

Step 1: In the SecondTableViewController.h file write your own init method which should look like this

- (id)initWithStyle:(UITableViewStyle)style andIndexNumber:(int)_indexNumber;

Now the reason why you will write your own init method is that we will first fetch the data from the FirstTableViewController regarding which row was selected and then supply that data to the SecondTableViewController and then add some code so that the SecondTableViewController displays the data as per the selected row from the FirstTableViewController, so now in the init method I will have the following code

- (id)initWithStyle:(UITableViewStyle)style andIndexNumber:(int)_indexNumber  {
    // Override initWithStyle: if you create the controller programmatically and want to perform customization that is not appropriate for viewDidLoad.
    if (self = [super initWithStyle:style]) {
 
  switch (_indexNumber) {
   case 0:
    companyProducts = [[NSMutableArray alloc]initWithObjects:@"iPod",@"iPhone",@"Macbook pro",@"Apple TV",nil];
    break;
   case 1:
    companyProducts = [[NSMutableArray alloc]initWithObjects:@"i3 processor",@"i7 processor",@"Core 2 duo Processor",@"Quad Core Processor",nil];
    break;
   
   case 2:
    companyProducts = [[NSMutableArray alloc]initWithObjects:@"Office Suite",@"Visual Studio",@"Windows Vista",@"Windows 7",nil];
    break;
   
   case 3:
    companyProducts = [[NSMutableArray alloc]initWithObjects:@"Search Engine",@"Google Earth",@"Google Map",@"Android",nil];
    break;
  }
  self.title = @"Second View";
    }
    return self;
}


Code Explanation: In the above code the currentIndex will be coming from the FirstTableViewController and if you look at the code its quite self explanatory like once I know the currentIndex value based upon that I am initializing my NSMutableArray.

Step 2: select the FirstTableViewController.m file and go to the selected index method and create the object of the class SecondTableViewController, and use your init method which would look like this

- (void)tableView:(UITableView *)tableView didSelectRowAtIndexPath:(NSIndexPath *)indexPath {

 SecondTableViewController *sTVC = [[SecondTableViewController alloc]initWithStyle:UITableViewStyleGrouped andIndexNumber:indexPath.row];
 [self.navigationController pushViewController: sTVC animated:YES];
 [sTVC release];
}

Now If you select the second row in the first view ( Intel ) , you will be navigated to the intel's second view. Have a look below.


                       Intel row selected 


Apple row selected